Monday, 26 February 2018
Collect client information via javascript
function ClientEnvironmentData() {
var data = [];
data.push({ Key: "navigator.appName", Value: navigator.appName });
data.push({ Key: "navigator.userAgent", Value: navigator.userAgent });
data.push({ Key: "navigator.appVersion", Value: navigator.appVersion });
data.push({ Key: "navigator.appCodeName", Value: navigator.appCodeName });
data.push({ Key: "navigator.platform", Value: navigator.platform });
data.push({ Key: "navigator.oscpu", Value: navigator.oscpu });
data.push({ Key: "navigator.cookieEnabled", Value: navigator.cookieEnabled });
data.push({ Key: "navigator.doNotTrack", Value: navigator.doNotTrack });
data.push({ Key: "navigator.language", Value: navigator.language });
data.push({ Key: "navigator.onLine", Value: navigator.onLine });
data.push({ Key: "navigator.product", Value: navigator.product });
data.push({ Key: "navigator.productSub", Value: navigator.productSub });
data.push({ Key: "navigator.vendor", Value: navigator.vendor });
data.push({ Key: "navigator.vendorSub", Value: navigator.vendorSub });
data.push({ Key: "window.outerWidth", Value: window.outerWidth });
data.push({ Key: "window.outerHeight", Value: window.outerHeight });
data.push({ Key: "window.innerWidth", Value: window.innerWidth });
data.push({ Key: "window.innerHeight", Value: window.innerHeight });
this.getData = function() {
return data;
}
this.getDataAsXml = function() {
var xml = "";
for (var i = 0; i < data.length; i++) {
xml += "<" + data[i].Key + ">" + data[i].Value + "</" + data[i].Key + ">";
}
return xml;
}
}

Tuesday, 6 February 2018
Make REST service
Controllers inherit from ApiController

Methods return an IHttpActionResult

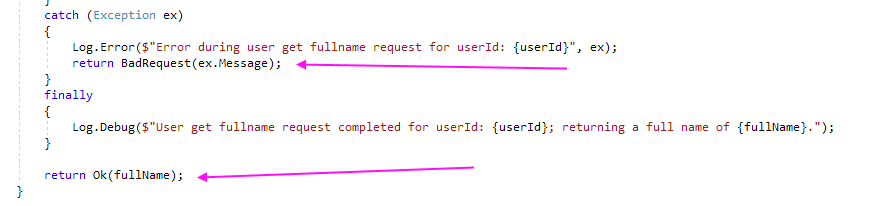
Use the helper stuff to return good or bad results
Creating a Web API project will include MVC stuff, but you don't need it. Can create an Empty project and just add in Web API. Include the MVC stuff to get views etc. You can include if you want to make a nice homepage for your REST service with some cat pictures on it?

.Net consume REST using HttpClient
Create HttpClient and setup in the constructor
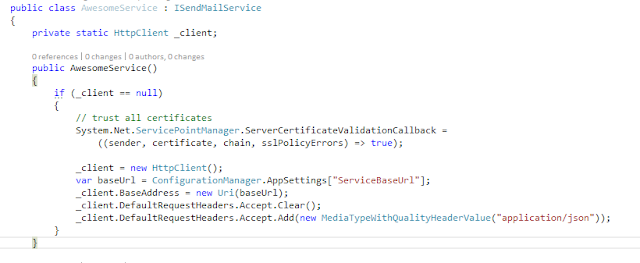
Make requests as required. Use .Result after the post to make life synchronous.

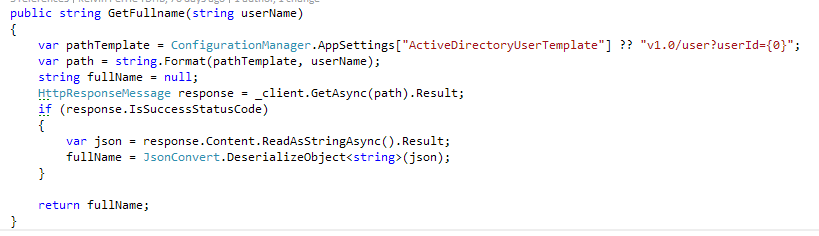
Pull info from the response if needed, use Newtonsoft.Json to deserialize to objects.
Stuff, stuff, stuff
public class AwesomeService : IAwesomeService
{
private static HttpClient _client;
public AwesomeService()
{
if (_client == null)
{
// trust all certificates
System.Net.ServicePointManager.ServerCertificateValidationCallback =
((sender, certificate, chain, sslPolicyErrors) => true);
_client = new HttpClient();
var baseUrl = ConfigurationManager.AppSettings["ServiceBaseUrl"];
_client.BaseAddress = new Uri(baseUrl);
_client.DefaultRequestHeaders.Accept.Clear();
_client.DefaultRequestHeaders.Accept.Add(new MediaTypeWithQualityHeaderValue("application/json"));
}
}
public void DoThing(string from, string to)
{
var paramTemplate = ConfigurationManager.AppSettings["ParamTemplate"] ?? "v1.0/email?from={1}&to={2}";
var path = string.Format(paramTemplate, from, to);
HttpResponseMessage response = _client.PostAsync(path, null).Result;
response.EnsureSuccessStatusCode();
}
}
public string GetFullname(string userName)
{
var pathTemplate = ConfigurationManager.AppSettings["ActiveDirectoryUserTemplate"] ?? "v1.0/user?userId={0}";
var path = string.Format(pathTemplate, userName);
string fullName = null;
HttpResponseMessage response = _client.GetAsync(path).Result;
if (response.IsSuccessStatusCode)
{
var json = response.Content.ReadAsStringAsync().Result;
fullName = JsonConvert.DeserializeObject<string>(json);
}
return fullName;
}

Make requests as required. Use .Result after the post to make life synchronous.
Pull info from the response if needed, use Newtonsoft.Json to deserialize to objects.
Stuff, stuff, stuff
public class AwesomeService : IAwesomeService
{
private static HttpClient _client;
public AwesomeService()
{
if (_client == null)
{
// trust all certificates
System.Net.ServicePointManager.ServerCertificateValidationCallback =
((sender, certificate, chain, sslPolicyErrors) => true);
_client = new HttpClient();
var baseUrl = ConfigurationManager.AppSettings["ServiceBaseUrl"];
_client.BaseAddress = new Uri(baseUrl);
_client.DefaultRequestHeaders.Accept.Clear();
_client.DefaultRequestHeaders.Accept.Add(new MediaTypeWithQualityHeaderValue("application/json"));
}
}
public void DoThing(string from, string to)
{
var paramTemplate = ConfigurationManager.AppSettings["ParamTemplate"] ?? "v1.0/email?from={1}&to={2}";
var path = string.Format(paramTemplate, from, to);
HttpResponseMessage response = _client.PostAsync(path, null).Result;
response.EnsureSuccessStatusCode();
}
}
public string GetFullname(string userName)
{
var pathTemplate = ConfigurationManager.AppSettings["ActiveDirectoryUserTemplate"] ?? "v1.0/user?userId={0}";
var path = string.Format(pathTemplate, userName);
string fullName = null;
HttpResponseMessage response = _client.GetAsync(path).Result;
if (response.IsSuccessStatusCode)
{
var json = response.Content.ReadAsStringAsync().Result;
fullName = JsonConvert.DeserializeObject<string>(json);
}
return fullName;
}
Configuring Log4net
reference:
https://stackoverflow.com/questions/10204171/configure-log4net-in-web-application
Add the nuget package:

Stick this line somewhere:
[assembly: log4net.Config.XmlConfigurator(Watch = true)]
(like the AssemblyInfo.cs file, or just cram it at the top of your controller like a madman - but only include it once)
Configure web.config settings:
<configSections>
<section name="log4net" type="log4net.Config.Log4NetConfigurationSectionHandler, log4net" />
</configSections>
<log4net debug="true">
<appender name="RollingLogFileAppender" type="log4net.Appender.RollingFileAppender">
<file value="RollingLog.txt" />
<appendToFile value="true" />
<rollingStyle value="Size" />
<maxSizeRollBackups value="5" />
<maximumFileSize value="10MB" />
<staticLogFileName value="true" />
<layout type="log4net.Layout.PatternLayout">
<conversionPattern value="%-5p %d %5rms %-22.22c{1} %-18.18M - %m%n" />
</layout>
</appender>
<root>
<level value="DEBUG" />
<appender-ref ref="RollingLogFileAppender" />
</root>
</log4net>
Get a reference to the logger
private static readonly ILog Log = log4net.LogManager.GetLogger(System.Reflection.MethodBase.GetCurrentMethod().DeclaringType);
Go crazy logging things


Output looks like

Versioning in REST
Details at
https://github.com/Microsoft/aspnet-api-versioning/wiki
Add the nuget package
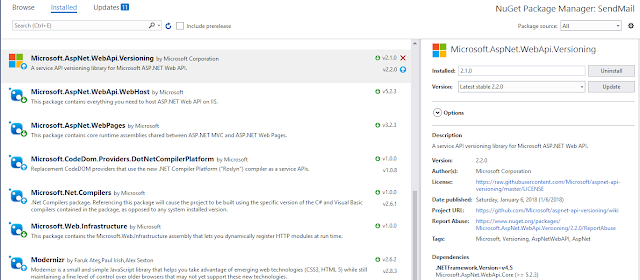
Decorate the controller
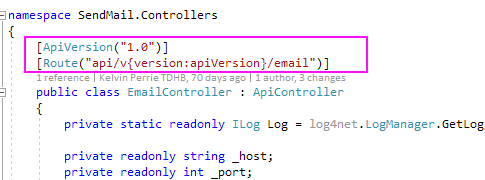
Access the API using the new path (described in the values that decorate the controller), e.g. http://whatever/api/v1.0/email


Edit:
The WebApiConfig should be updated automatiically(?) but sometimes isn't?
The error:
https://github.com/Microsoft/aspnet-api-versioning/wiki
Add the nuget package

Decorate the controller
Access the API using the new path (described in the values that decorate the controller), e.g. http://whatever/api/v1.0/email
Can test using Swagger. Install Swashbuckle nuget package. Run your project and go to your URL with swagger on the end, e.g.
http://localhost:10539/swagger
which will redirect to http://localhost:10539/swagger/ui/index
This lists your controllers.

Click the one you want to test and available actions are shown. The non-versioned one will not work.

Click the one with the version in the URL. Enter params where required and click 'try it out!'.

Confirm the response is ok.

Edit:
The WebApiConfig should be updated automatiically(?) but sometimes isn't?
The error:
The inline constraint resolver of type 'DefaultInlineConstraintResolver' was unable to resolve the following inline constraint: 'apiVersion'
Mean you need to resolve the apiVersion value in WebApiConfig; it should look something like
// Web API routes
var constraintResolver = new DefaultInlineConstraintResolver()
{
ConstraintMap =
{
["apiVersion"] = typeof( ApiVersionRouteConstraint )
}
};
config.MapHttpAttributeRoutes(constraintResolver);
config.AddApiVersioning();
config.Routes.MapHttpRoute(
name: "DefaultApi",
routeTemplate: "api/{controller}/{id}",
defaults: new { id = RouteParameter.Optional }
);
Mean you need to resolve the apiVersion value in WebApiConfig; it should look something like
// Web API routes
var constraintResolver = new DefaultInlineConstraintResolver()
{
ConstraintMap =
{
["apiVersion"] = typeof( ApiVersionRouteConstraint )
}
};
config.MapHttpAttributeRoutes(constraintResolver);
config.AddApiVersioning();
config.Routes.MapHttpRoute(
name: "DefaultApi",
routeTemplate: "api/{controller}/{id}",
defaults: new { id = RouteParameter.Optional }
);
Oracle.ManagedDataAccess - accessing Oracle from .Net without having to install any Oracle client
"ODP.NET, Managed Driver is a 100% native .NET code driver. No additional Oracle Client software is required to be installed to connect to Oracle Database."
Add this nuget package:

Stuff gets added to config; configure connection
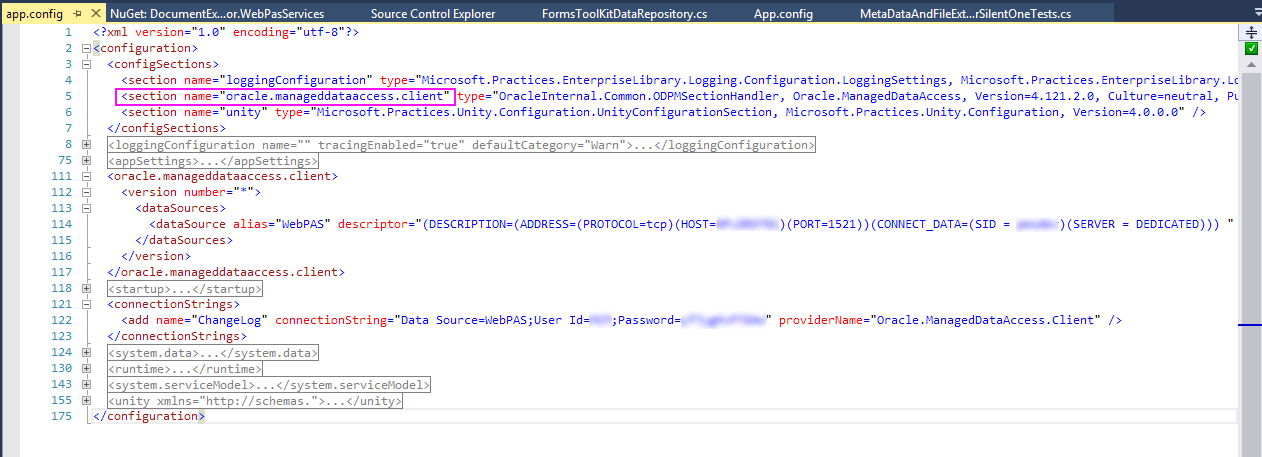
Have had a problem when multiple connection strings with them not reading from the aliased data source. Can skip the datasource config elements and put it directly into the connection string.
Accessing the connection string as per standard

Use the OracleCommand same way as SqlCommand. To issue command (e.g. update):
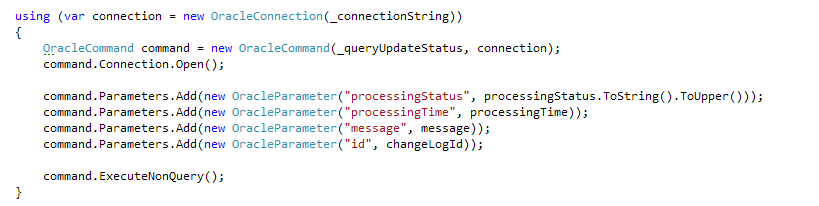
or to read data (e.g. select):
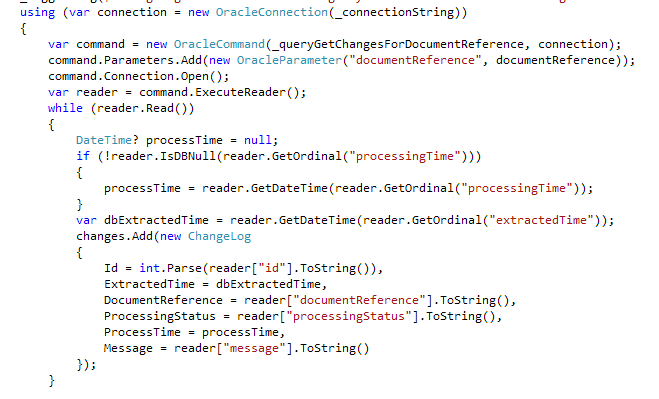
Parameters in the query are prefixed with colon:

NOTE: Ensure that the params added in the code (e.g. using the command.Parameters.Add) are done in the same order as they occur in the query. Even though a name is specified when adding a parameter, by default that is ignored.
TFS 2017 build & release with config transforms
I love config transforms. I do not love TFS environment variables.
These are notes on how to have two builds (debug and release) but multiple target environments (e.g. dev, test and prod) with different web.config settings applied during the release steps (which is done by web.config transforms).
The high level process is:



These are notes on how to have two builds (debug and release) but multiple target environments (e.g. dev, test and prod) with different web.config settings applied during the release steps (which is done by web.config transforms).
The high level process is:
- Setup a debug and release build. The debug build of the code goes to dev server, the release build goes to test and prod servers.
- During the release to each environment the config transforms are applied to ensure the config is relevant to the environment it is going to (e.g. connects to right database/webservices, has right app settings)
- The code going to both test and prod is identical (with an altered config).
- You don't have to do a build for each environment. You can just do a debug and release build which is quicker if you have a lot of environments
- You don't have to change the project file to add in a transform step. That step will actually apply to local builds which is a pain (you can create a 'localdebug' config and use that local but who can be bothered). Although I guess you could do an XDT Transform step during your build without changing the proj file (haven't tried this, but should work).
Do the build
Setup the BuildConfiguration to do a debug and release build by updating BuildConfiguration variable and turning on multi-configuration.
Configure artifact names so the different builds can be distinguished:
This means two builds happen:
Wow.
Do the release
The artifact can be copied to the final website location (e.g. the IIS directory) and the config transform applied there, but there will be a short time where the code will be deployed and the transform not applied - for that time users accessing will get the site with non-transformed (e.g. development) config. So process is:
- stick the artifact files in a temp/working directory
- do the transform for the environment
- move the files to the final website directory
Create release definition(s)
Copy the files from the artifact to a working directory (create the directory manually (or add a step to do it) first or this copy step will fail)
Apply the config transform to the files in the working directory (this comes from the marketplace https://marketplace.visualstudio.com/items?itemName=qetza.xdttransform#overview)
How does this work when it doesn't have any credentials associated with the step? Dunno. Maybe because the previous copy files step does pass credentials, so the process is already considered authorised on the remove machine.
Copy the files from the working directory to the website directory
Optional: delete the config transforms and clean the working directory:
You have to get the remote delete step from the marketplace. There is a bug with it where if your path has a space you need to wrap it in single quotes.
Subscribe to:
Posts (Atom)